🐍 Python Tutorial for Absolute Beginners
📘 Topic: Python Intro + Install, Hello World + Comments, Variables & Data Types
🔹 1. Introduction to Python
What is Python?
Python is a high-level, interpreted, general-purpose programming language that is known for its simplicity and readability. It is widely used in web development, data science, artificial intelligence, machine learning, automation, and more.
Key Features of Python:
-
Easy-to-read syntax
-
Large standard library
-
Dynamically typed
-
Open-source and community-driven
-
Cross-platform
-
Extensive third-party modules (e.g., NumPy, pandas, Django)
Why Learn Python?
-
Beginner-friendly
-
Versatile and powerful
-
In-demand skill for jobs in tech, data, and science
-
Great community and resources
🔹 2. Installing Python
Step-by-Step Installation Guide:
✅ For Windows:
-
Download the latest version (e.g., Python 3.12.x).
-
Run the installer.
-
Important: Check the box “Add Python to PATH” before clicking "Install Now".
-
After installation, open Command Prompt and type:
You should see the installed Python version (e.g.,
Python 3.12.0).
✅ For macOS:
-
Use Homebrew (recommended):
-
Or download from python.org.
✅ For Linux:
Install via terminal:
Check version:
🔹 3. Writing Your First Python Program (Hello World)
Using the Command Line
-
Open your terminal or command prompt.
-
Type:
-
Enter:
You should see:
Using a Script File
-
Open a code editor like VS Code, Sublime Text, or Thonny.
-
Create a new file and name it
hello.py. -
Write the following code:
-
Save the file.
-
Run the script from terminal:

🔹 4. Comments in Python
Comments help you explain what your code does. Python supports:
🔸 Single-Line Comments
Use # before the comment:
🔸 Multi-Line Comments
Use triple quotes (''' or """):
Note: Triple quotes are also used for documentation (docstrings).
🔹 5. Variables in Python
What is a Variable?
A variable is a name that refers to a value stored in memory.
Rules for Naming Variables:
-
Must start with a letter or underscore
_ -
Cannot start with a number
-
Can include letters, numbers, and underscores
-
Are case-sensitive (
nameandNameare different)
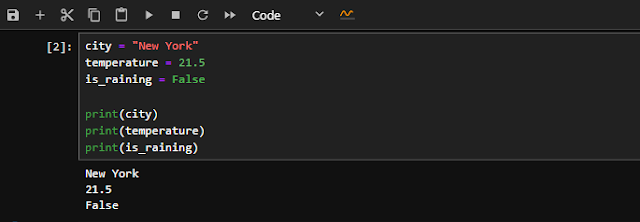
Example:
city = "New York"
temperature = 21.5
is_raining = False

print(city)
print(temperature)
print(is_raining)

🔹 6. Python Data Types
Python is dynamically typed, meaning you don’t need to declare a type—it figures it out.
Here are the most commonly used data types:
6.1 🔢 Numbers
Integer (int):
x = 10
print(type(x))  # <class 'int'>


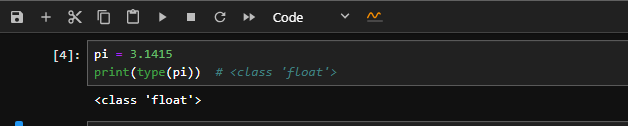
Float (float):
pi = 3.1415
print(type(pi))  # <class 'float'>

Complex (complex):
z = 2 + 3j
print(type(z))  # <class 'complex'>


6.2 🔤 Strings
Strings are sequences of characters.
message = "Hello, Python!"
print(message)
print(len(message))  # Length of string
print(message.upper())  # HELLO, PYTHON!


You can use single ' or double " quotes:
6.3 ✅ Booleans
Only two boolean values: True and False
is_sunny = True
is_night = False
print(type(is_sunny))  # <class 'bool'>


6.4 📦 Lists
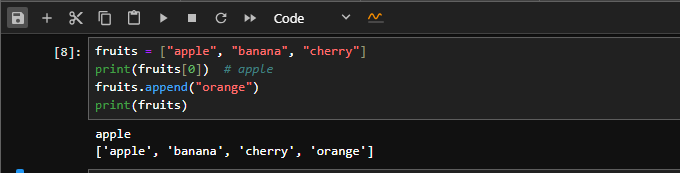
Lists are ordered, mutable, and can hold mixed types.
fruits = ["apple", "banana", "cherry"]
print(fruits[0])  # apple
fruits.append("orange")
print(fruits)

6.5 📦 Tuples
Tuples are like lists but immutable.
coordinates = (10, 20)
print(coordinates)


6.6 🧾 Dictionaries
Dictionaries store key-value pairs
person = {
    "name": "Alice",
    "age": 30,
    "city": "London"
}
print(person["name"])  # Alice


6.7 🔢 Sets
Sets are unordered, and no duplicate values.
nums = {1, 2, 3, 2, 1}
print(nums)  # Output: {1, 2, 3}


🔹 7. Type Casting
Convert between data types using casting functions.
x = 5
y = float(x)
z = str(x)

print(y)  # 5.0
print(z)  # "5"


Casting functions:
-
int() -
float() -
str() -
bool()
🔹 8. The type() and id() Functions
-
type(variable)→ returns the type of the value. -
id(variable)→ returns the unique memory location.
a = 10
print(type(a))  # <class 'int'>
print(id(a))    # e.g., 140739212139920
%20and%20id()%20Functions.PNG)
%20and%20id()%20Functions.PNG)
🔹 9. Best Practices for Beginners
-
Use clear, meaningful variable names.
-
Add comments where needed.
-
Keep your code clean and consistent.
-
Use an IDE or code editor with syntax highlighting.
-
Practice often!
🔹 10. What’s Next?
Now that you understand the basics:
-
✅ Install Python
-
✅ Run your first program
-
✅ Use comments
-
✅ Declare variables
-
✅ Work with data types
Next topics to learn:
-
Control Flow (
if,else,elif) -
Loops (
for,while) -
Functions
-
Error handling
-
Object-Oriented Programming
🎯 Conclusion
Python is an excellent first language, and now you’ve taken your first big step. Practice writing small scripts, experiment with variables and data types, and build your confidence!